Showing posts with label cooking. Show all posts

Saturday, September 19, 2015

Gummy Legos

I'm sure you've seen this video:


It's an instructional video for how to make gummy Legos.

If you have a Lego-obsessed child, perhaps many people have posted a link to this video on your Facebook wall. Maybe, after the fifth or sixth time someone did that, you casually browsed Amazon.com for Lego silicon molds and, even more casually, ordered a few of them to be delivered to you for free via Amazon Prime. And maybe your Lego-obsessed child saw the molds after they arrived at your door, and pestered you daily about what they were for. And MAYBE, it rained on a Saturday morning, and you needed an activity to do with your child.

If it all happened that way for you, then stop reading. You know this story. You lived this story. If not, well, here's a recipe and a little exposition. 

To make Lego gummies, you need the following ingredients:
2 packets gelatin
1 package of jello
1/2 c cold water
1/4 c corn syrup


Mix the water and corn syrup together until the corn syrup is dissolved. The water has to be cold, according to the video, or your gummies won't be clear.  This step takes a long time (because the water is cold)...but not as long as the next step. 

Now, you will put your water/syrup solution into a pot over NO heat. You will pour in the two gelatin packets and the package of jello, and you will stir this cold mixture until all of the lumps disappear.
The lumps will be copious. You will start stirring this concoction with your child who will exclaim:

"It turned purple!"

"It smells like grape!"

And the always heart-melting, "I always wanted to cook this with you!"

But soon, the character of those statements -- commensurate with your child's age, level of patience, and mood --- will change:

"There sure are a lot of lumps."

"Why it take so long to stir all the lumps?"

"Are we done now?"  ("No, we will never be done.")

At some point, your child may dismount the step stool he/she was standing on and begin singing, "Lego Gummies, Lego Gummies, Lego Gummies," while spinning in the middle of your kitchen like a girl tripping at a Dead concert (or Phish, for you youngsters).

And then you will say, "Do you want to go into the living room and play with your Legos while I keep stirring?"  Yes, he/she will want to do that.

So you will continue stirring, attempting to get all the white bits to dissolve, and your kid will have a luxuriously long Lego  session:  plenty of time to switch around heads on many, many, many Lego men. 

Finally, it will look like this:
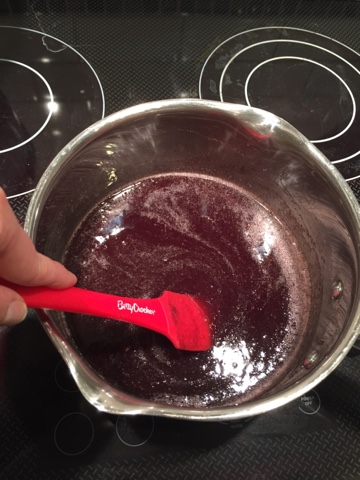
There will still be tiny lumps in it, but you won't care. 

Time to get this stuff on some heat. Set your burner to medium low. (On my cooktop, the heat setting is numbered 1 through 9, and I chose 4.)  Set your pot of goo onto the burner and cook until fully dissolved, stirring occasionally so the stuff doesn't burn. When it's clear, you're done. Here's what mine looked like:

Not remarkably different in the picture from the pre-cooked stuff, but the liquid went from slightly opaque to see-through. 

Next, the video says you can pour your liquid straight into your molds now, but that doesn't resolve the problem of the foam that has developed on top. That won't make a pretty gummy. The video's suggestion for dealing with foam is to pour your liquid into a heat resistant glass, let it cool for 10 minutes, skim the foamy film from the top, put the liquid into a condiment bottle and then squirt it into your molds. Here's what I did:
Gravy fat separator:  probably gets used once a year, if that, around the holidays, and IF I make a turkey. Worked great for this application.  Kitchen multitasker:  Alton Brown would be proud. 

Now, you're ready to dish out your gummy syrup into the molds. Or you would be if your molds were dry.

Ideally, you would have unpackaged your molds and washed them at least a day before embarking on your gummy adventure. But this is not the ideal world. This is the world in which you washed these little molds with all of their crevices mere minutes before starting your series of long, slow stirs. So before you dish up your liquid, be sure to dry the inside of your molds with a hairdryer to ensure all the little crannies are dry. It won't do to go pouring your liquid into wet molds, thus, (potentially) ruining the syrup you've just stirred your left arm off for. 

Your strange hairdryer activity will draw the attention of your child again, who will come into the bathroom to watch. Your spouse might come into the bathroom too, and remark how surprised he/she is that those molds take so long to dry. 

"Nooks and crannies," you'll say. 

Finally, your molds will be dry. And you and your child will return to the kitchen to dish out the goo into the molds. You'll do it; child will watch. This stuff is hot and sticky. Don't let the kid touch it. 
Once dished into the molds, your child will want to eat them immediately. You will explain that we have to wait for them to cool and set up. 

"How long," the little cherub will ask.

And you will reply, "Five hours," which he/she will not fully comprehend, but will accurately describe as "a long time" before immediately asking again whether he/she can eat a Lego man gummy.

Finally, after lunch, and some play, and a nap, and a stint in the fridge to hurry the gummies along, not quite five hours will have elapsed. Time for a gummy snack!

How did they turn out?

"Yummy!," your child will exclaim. 

Yep, we'll make 'em again. 


Wednesday, July 2, 2014

Why Don't You Just Bake Off?!

My office has an annual Independence Day bake off. 

Two years ago, I made red, white and blue swirl cookies.  I even blogged about the process of making them. 

I got, I think, second or third place for Most Patriotic Dessert that year.


Last year, I made some oatmeal, flax and dried fruit concoction under the guise of "healthy," and got a second or third place, for, er, something or another category. 

Undaunted, this year I present to you, and mainly to my office mates, these:


Red, White and Blue Cookies. 

They're not red, white, or blue, you say?  Well, they are and they aren't.  Essentially, they're chocolate chip cookies, but, instead of semi-sweet chocolate morsels, you use 1 cup white chocolate chips, 1 cup dried cranberries, and 1 cup dried blueberries.  See?  Red, White, and Blue.

I basically followed this woman's recipe, except that I used 1 cup dark brown sugar instead of 1/2 cup brown sugar and 1/2 cup granulated. 

The brown sugar makes a chewier cookie with a bit more caramel-like flavor. 

After you scoop the dough onto the baking sheet, you sprinkle them with a little kosher salt. 

That makes 'em classy.  All classy desserts feature the salty/sweet contrast in these our modern times. 

The Boy really liked them....


...until he hit a dried blueberry. Not his thing. But The Working Dad and I liked them, dried blueberries and all. 

But how did they fare in the bake off, you may wonder?

Well....


PARTICIPANT?!

Really??

Philistines.

Seriously, I did get Honorable Mention for Best Tasting Dessert, and got these nifty prizes!


And five different people asked me for the recipe for my cookies, with many others telling me that they liked the cookies.  That's never happened to me before with the bake off.

So maybe competition this year was just particularly fierce.  (Still, participant, y'all?  Not even Third in one category?  What, was I half the office's second favorite, thus garnering no votes? Always the bridesmaid . . . .

But I've come to terms with the green ribbon and I am trying to look at it this way:  Now, I just need one more ribbon to have a complete set. 


Better luck to me next year!  And you'd better watch out, You-Know-Who-You-Are.  My Kitchenaid mixer and I are coming for you

Happy Independence Day, Y'all!


Sunday, April 13, 2014

I confess: I use canned foods.

It's true. I don't soak my beans. I don't hand-dice my tomatoes. I must apologize to America's Test Kitchen and foodies everywhere because I use Wick Fowler's 2 Alarm Chili Mix and Rotel Tomatoes and Morning Star meatless crumbles to make chili on a rainy day. On sunny days too.... Because it's easier.

THE END


Saturday, March 23, 2013

Vegan Peanut Butter Cookies

Oh yum! I found a recipe online for vegan peanut butter cookies, and adapted it according to my tastes and pantry. The result is a yummy, chewy cookie that you'd probably not guess was animal-product-free. You could also probably make almond butter cookies, or even make them gluten free by using almond flour. ( I wonder if tahini cookies would be too weird.) I like playing around with recipes to make them my own. It's what makes cooking fun...a little bit of art, a little bit of science, a little ingenuity when you're missing an ingredient.....

So...anyway...recipe! Here we go!

1 tube Ella Organics butternut squash, carrot, apple, and prunes (or a little over half a cup of apple sauce)
3/4 cup peanut butter
1/4 cup soy milk
1 tsp vanilla
1 1/4 cup brown sugar
1 3/4 cup whole wheat flour
3/4 tsp baking powder
3/4 tsp salt

Bake at 375 (or 350 convection).

Sift together dry ingredients. Cream together the fruit/veg purée, peanut butter, soy milk, vanilla, and brown sugar. Add dry ingredients to the wet in three batches. Roll the stiff dough into 1.5 inch balls. If you want to be a traditionalist, roll the balls in white sugar before you place them on the cookie sheet. Do that peanut-butter-cookie-crosshatch-thing with a fork. Bake 8 to 10 minutes. Makes about 3 dozen cookies that look like the ones below. Yum!


Saturday, March 16, 2013

Veggie Barley Risotto

We've made Chicken Barley Risotto for years. I adapted from a recipe Mark Bittman created for Thanksgiving Turkey left overs, which I'd run across in the New York Times.

In an effort to reduce the amount of animal products we eat, I decided to see if our barley risotto could go vegan.

Oh yeah, it sure can!

I actually love this recipe better than the chicken version, so much so that I'm planning to put it into weekly rotation. And, The Working Dad went back for thirds. Whoop!

Here's the recipe:

First, a note: except for the barley, broth and water, I just eye-ball the measurements.

1 cup pearled barley
1.5 cup vegetable broth
1.5 cup water
2 table spoons canola or olive oil
2 shallots chopped
1.5 cup mushrooms (I used portobellos this time, but whatever you've got.)
1.5 cup chopped veggies (Here, you can experiment or just use what's in your fridge. I used asparagus and carrots because that's what I had on hand.)
3 handfuls baby spinach
1/3 cup soy parmesan (optional)
1 to 2 tablespoons of the herbs of your choice (You'll need less if you use dried. I just grabbed the Italian blend from my pantry, but dill or tarragon are lovely in the chicken version and would probably be great in this too.)

In a skillet, sauté (in the oil) the shallots, mushrooms, and chopped veggies until the veggies start to look bright whatever-color-they-are. Throw in the spinach and allow to wilt. Toss in the barley and toast it for a minute to a minute and a half. Pour in the broth and water. Add the herbs. Simmer on low until the barley cooks, 30 to 45 minutes. The barley and mushrooms make a nice sauce, so you can skip the soy cheese, if you like. But for a little added richness and flavor, toss in your soy cheese at the last minute and allow to melt. Serve by itself or with a salad and toast.

I can't wait to experiment with various farmers market veggies with this recipe this spring! Yummers!

Saturday, June 30, 2012

Patriotic Cookies

I don't mean that title ironically.  I mean that Independence Day (you know, The Fourth of July) is approaching and I've made some patriotic sugar cookies.

What does making cookies have to do with the tenuous work-life balance of a working mother?  Well, other than we mommies often like to make, and are sometimes asked to make, cookies for the kiddos, not much.  No feminist screed today, ladies and gents, just a photographic tour of my afternoon of cookie baking.

So, here's my attempt as some Independence Day, patriotic pinwheel sugar cookies:

First, make your favorite sugar cookie dough.  (Or, hey, working lady, make it easy on yourself and go buy your favorite pre-made dough at the supermarket.  I won't tell.)  Divide into thirds.  Leave one third alone.  It's your white stripe.

With the other two thirds, dye one red and one blue with gel food coloring.  (Gel food coloring will get you more vibrant colors.  If you're fine with more pastel shades, the liquid kind is fine.)  I found that the best way to get the color fully incorporated into the dough is to knead it in with your hands.  I wear vinyl gloves  to do this so I don't dye my hands.  You can get the gloves in the paint section of your hardware store.  (I like to keep such gloves in my kitchen for cutting up peppers so I don't accidentally wipe serrano juice into my eye an hour after I've cooked dinner.)  Use a different pair of gloves for the red and for the blue, unless you want purple.  In which case, carry on.

Once you have the color incorporated, form it into a round and place it between two pieces of parchment paper for rolling.


I sort of eye-balled it on the size of the cookie-dough pancake I wanted to roll.  As you can probably see, the oils from the prior cookie dough rounds (I rolled white first, then blue) left an image of the size of the prior cookie-dough pancake, so I just made the subsequent pancakes fit the oil spot.  If you want to measure yours out precisely, go for it, but who has time to find a ruler when they're baking and who, other than the people on America's Test Kitchen, keeps a cooking ruler in their kitchen?  (But good for you if you do, friend, you are a better baker than I.)

So I rolled the white out and set it aside.  Then I rolled the blue out and placed it on top of the white.


Then I put the red on top of the blue and the white...


... so that I had a stack of three cookie-dough pancakes.  Time to start rolling.

Use the parchment paper to help you roll your giant colorful pancake into a log.


By this time, your dough will have gotten pretty soft because, even though you're in an air conditioned house, it's hot as blazes outside and you've been working the heck out of that dough.  So be patient and go slowly.  (And rest comfortably in the knowledge that when you make red, white and green ones for Christmas later this year, the dough won't have gotten nearly as loose by this stage.)

Now, wrap the parchment around the log and use your hands to form it into a log shape (if yours, like mine, sort of started to go a little oblong on you).


I wrapped this parchment covered log of red, white and blue sugar-goo in a couple of layers of plastic wrap to help it keep its shape.

Next, I put my 4th o' July Log into the fridge and let it harden up for a few hours.  I used the little wine caddy thing in my fridge to hold the cookie log to help keep its shape.


(If your wine caddy thing still has a wine bottle in it, maybe you want to have yourself a glass of wine while you wait for the log to firm up.  Or fold laundry, like me.  Whichever.)

Soooo . . . after a sufficient amount of time . . . probably several hours, depending on your dough, you should have a nice firm cookie-dough log like this:


Slice the log into approximately 1/4 inch to 1/2 inch (depending on how big you want your cookies) slices and bake according to your cookie dough recipe's directions (or, according to the package directions, if you took a short cut).  My cookies needed about 12 minutes.

I recommend using a very sharp cooking knife to ensure that the cuts are clean.  And you should rinse and wipe your knife several times during the process so it won't stick.  Don't worry if your first few slices aren't super-swirly.  Once you get into the middle of the log, you'll see nice swirls like this:


Also, you may want to toss your dough back into the fridge to keep it cool and, thus, firm enough to cut.  Or you may want to do what I did, which is probably not as effective and putting it back in the fridge:


And, after 12 minutes, or however long you need, you've got your finished cookies!  I let them cool on the pan several minutes before transferring them to a cooling rack to finish cooling.  (I found that if I didn't let them cool awhile in the pan, they sort of fell apart on the transfer and became a red, white, and blue mess.)


When they're completely cool, transfer them into a storage container and get ready to wow your friends, neighbors, and countrymen with your fantastic patriotic pinwheel sugar cookies!

Or, maybe just go ahead and pour yourself a glass of milk and plate one up for yourself.  Mmmm-mmmm, star-spangled goodness.


Happy Independence Day, Everybody!

Sunday, May 27, 2012

Dinner

Crimeny, it's hard to get dinner on the table of a weeknight!

I've been mining Pinterest for weeks for a solution:  meals you prepare ahead and freeze, crockpot meals, crockpot meals you prepare ahead and freeze.  I've tried a couple of crock pot meals.  They're okay.  But mainly, they're not the healthiest things in the world, often high in sodium or very cheesy.  And, honestly, most of them are not all that yummy either.  Maybe I'm just doing it wrong, though.  I've never been good with a crockpot . . . except for Rotel dip.  But how hard can a slow cooker meal be when the instructions are usually "dump all of this stuff into the pot, set it on low, wait six hours."

And frozen meals seem like a good idea, but the thaw time means it takes just as long to get food on the table.

What The Working Family wants are healthy, vegetable rich meals that we can get onto the table in about 30 minutes, tops.

Anyway, in discussing our mealtime woes, The Working Dad and I noticed something about the meals we tend to cook the most.  They tend to involve the same or nearly the same basics:  diced onions, diced bell pepper, diced celery, and (most of the time) diced chicken.  (Those three vegetables -- onion, bell pepper, and celery -- are called "The Trinity" in Cajun cooking, but that's just a coincidence, except for one dish.)  The great thing about onions, bell peppers, and celery is that they can go easily into a pasta sauce, fajitas, Asian stir-fry, and shrimp creole, which are all family faves.

So here's the plan:  every Sunday evening, we're going to dice up onions, peppers, celery and chicken and store it in the fridge ready for a week's use.  We'll plan the week's menu around our standard fare and post it in the kitchen. That way, we always know what's for dinner.  (Finding the right menu posting method has, itself, been quite a Pinterestian odyssey.)

Then all that will need to be done is for the first person to the kitchen to throw the staple ingredients, appropriate spices, and few additional ingredients for whatever's for dinner that night into the pan and get it going.  There should be virtually zero prep time (like opening a bag of frozen broccoli, or a jar of pasta sauce, or a can of beans), so it should be simple, right?  I hope so.  I'll report back after a few weeks to let you know how it's worked out.  (And, ideally, this plan will slot neatly into the as yet un-blogged Mommy Finally Loses The Baby Weight Plan.)

Hey, if it works, maybe I'll take some photos of our meals and post my own Weeknight Meals Made Easy pin onto Pinterest, thus simplifying the lives of harried mommies everywhere!

Happy Sunday, Friends!